
Bandlab: Creating your first track - Virtual Instrument Track
An overview of each track type in Bandlab, beginning with Virtual Instrument Tracks

When you first select Create at the top right of the screen when you visit Bandlab, you’ll see the quick start menu

In this quick guide which begins a series looking at what Bandlab has to offer as a free browser-based DAW, we’ll select Instruments first. We’ll explore the other types of tracks as we go.
An instrument track allows you to choose from a range of different virtual instruments which are available in groups of sounds, called banks. Each track in Bandlab can hold 1 instrument but when we delve further we may find we can play multiple instruments on one track. If this is a bit abstract, we’ll explore this later too. So once you become more confident, you can set up numerous instrument tracks and play different instruments to form a composition.
I want to stress at the outset that if you feel intimidated by this interface, there is absolutely no need. Not only does it aim to cater for complete beginners, I would stress that although having some kind of understanding of music production is always a bonus, it is by no means necessary. You can create the most interesting soundtracks and compositions without any prior musical understanding at all.
When you select Instrument Track
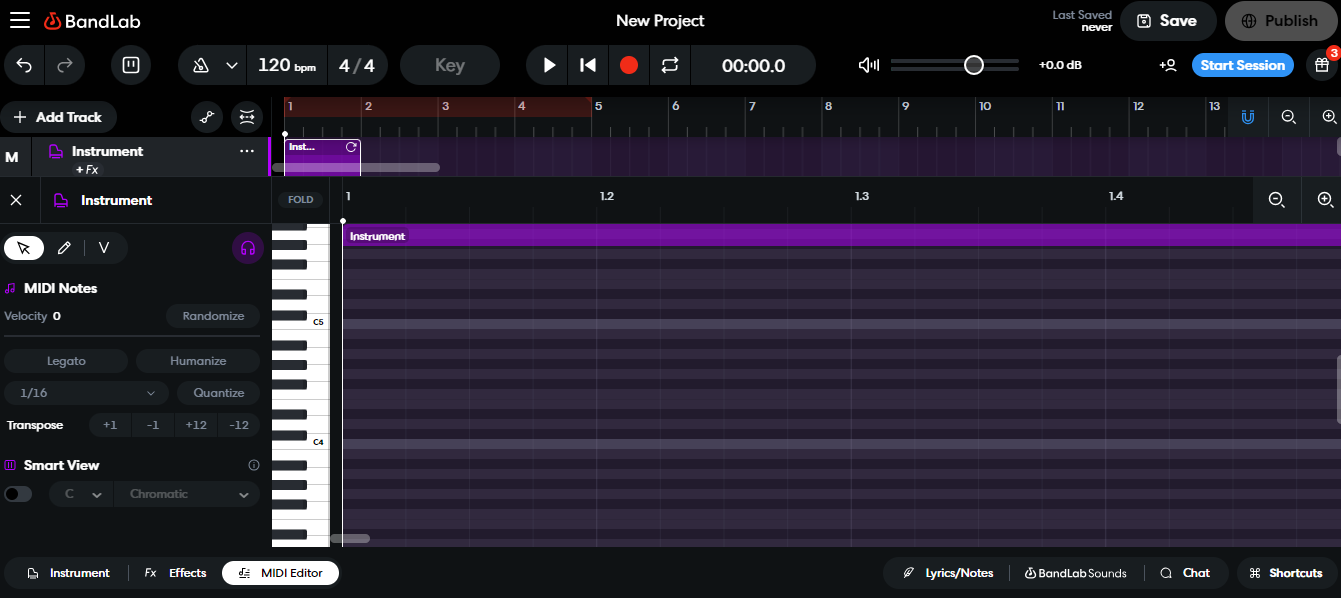
You will see the following screen, your view of this might differ slightly as this is what I saw on the computer screen I was on. If you have a higher resolution, you might see more tracks and more of the interface.

On this screen you will see various icons and ways to control your track.
At the top you have what is called the transport. This controls or turns off and on things like metronome, set tempo, press play, record and stop, set overall volume etc
Next you have the timeline which is where your track can be played, followed and you can arrange its start and end times.
Then you have a large keyboard, which is an on screen keyboard which you can use to rehearse notes and play or record notes into the track.
Just above the large keyboard you can select any sound you wish to use as your instrument sound from a large range of sound banks.
I can spend hours just rehearsing all the various instruments available in the banks, and thats before discovering all the other aspects that Bandlab has to offer. Lets assume for a minute that you have found the sound you want to use.

Once you have chosen an instrument double click in the track area next to the track listing, this will create a region that you can then use to start editing your sound.
The region in the track view by default gives you one bar of time to work with. If it gives you a longer amount of time, for example 4 bars, you can hover over the end of the bar in the track and reduce the time.

We want to keep this as 1 bar for now so reduce the length of the track if it is longer so the start and end are between the numbers 1 and 2 on the timeline like this

By default it launches a piano keyboard on its side. If it doesn’t for some reason, click on the region we just created
Now we can add some notes.
On the piano keyboard on its side, there are some lines that correspond to each of the keys.
This is called the piano roll and it allows you to add notes that will fill the Bar from 1-2 in the track view.
There are 3 tools to the left of the piano keyboard.
1 is the selection tool - used for selecting, moving and adjusting notes.

2 is the pencil tool for drawing notes.

3 is the Velocity tool which can be used to adjust the volume of individual notes.

For now we’ll use the Pencil tool
Click in the space next to the piano keyboard and you should hear a note
Create a few notes and don’t worry for now which notes you select, we can adjust them.
If you play the track with the space bar you will hear the notes play in a sequence. These have been added to the track above.
If it sounds to discordant to your ears, don’t worry.
Continue to keep adding notes until you create some kind of melody in the track between the number 1 and 2.
If you feel that you can’t begin to even think about the likelyhood of creating a melody. Any sequence of notes together is a melody, riff or musical motif of some kind. So just keep adjusting the notes by using the selection tool until it becomes pleasing to you.
It will look something like this.
If you want to rehearse the track over an over you can hit the loop key and this will loop the time line over the selected portion of the track and you can continue to add notes as you go.


If you want to delete notes, use the selection tool to select the note and then use the delete key on the keyboard.
If you want to edit the length of the notes, hover over the right of the note you have created and reduce or extend the length of the note.

Once you are happy with your 1 bar loop of an instrument. Start to create some new tracks with different instruments
Create as many as you like to try to make an interesting one bar loop. Experiment with sounds, melodies and sound effects.
Feel free to share your one bar loop creations as comments to this post.
Once I get creating soundtracks myself, you’ll be able to hear them here.